Klipper Camera - Selection and Configuration
Klipper is a 3D printing firmware that allows you to control and monitor your 3D printer from any device using a web browser interface. One of the features that Klipper offers is the ability to attach a camera to your 3D printer and use it for various purposes. In this article, we will explore some of the benefits of using a camera with Klipper, such as remote monitoring, detecting print failures, shooting time-lapse videos, and more. We will also compare the advantages and disadvantages of different types of cameras, such as USB webcams and Raspberry Pi cameras, and how to set them up with Klipper. By the end of this article, you will have a better understanding of how a camera can enhance your 3D printing experience with Klipper.
Benefits of Using a Camera with Klipper
Remote Monitoring
One of the benefits of using a camera with Klipper is that you can monitor your 3D printer remotely, as long as you are in the same wireless network. You can check the status of your print, see the progress of the layers, and spot any potential issues or errors from your web browser interface. This way, you can save time and energy by not having to physically go to your printer every time you want to check on it.
Another benefit of remote monitoring is that you can use any device to access your camera and printer. You can use your laptop, tablet or smartphone to view the live stream of your camera and control your printer. This makes it convenient and flexible for you to monitor your 3D printer from different devices.
Detecting Print Failures
Another benefit of using a camera with Klipper is that you can detect print failures and prevent them from ruining your prints. Print failures are common in 3D printing, and they can be caused by various factors, such as filament jams, nozzle clogs, power outages, bed adhesion problems, and more. If you don’t catch these failures early, they can result in wasted filament, damaged parts, and hours of frustration.
Moreover, you can use AI technology for print failure detection, which is a feature that Klipper offers when linked with Obico, a cloud-based application that uses machine learning and the power of AI to analyze your camera feed and detect print failures. Obico can recognize various types of print failures, such as spaghetti, blob, warp, layer shift, and more, and alert you accordingly. You can also use Obico to access your camera and printer remotely from anywhere, without having to set up port forwarding or VPN.
Shooting Time-Lapse Videos
A third benefit of using a camera with Klipper is that you can shoot time-lapse videos of your 3D prints and share them with others. Time-lapse videos are a great way to showcase your 3D printing projects, as they compress the long and tedious process of 3D printing into a short and captivating video. You can also use time-lapse videos to document your 3D printing journey, learn from your mistakes, and improve your skills.
Using a camera with Klipper, you can record your 3D prints and create time-lapse videos easily and automatically. You can choose the interval and quality of the snapshots, and Klipper will take care of the rest. You can also use the Octolapse plugin, which is compatible with Klipper, to create stunning time-lapse videos with stabilized and synchronized movements of the print head and the bed. You can also add effects, such as transitions, filters, and music, to your time-lapse videos using video editing software.
Another benefit of shooting time-lapse videos is that you can analyze the print quality and identify any issues or defects in your prints. You can zoom in and inspect the details of each layer, and see how the print quality changes over time. You can also compare the time-lapse videos of different prints and settings, and find the optimal parameters for your printer and filament. This way, you can use time-lapse videos as a tool for troubleshooting and optimization, and achieve better results with your 3D prints.
Choosing a Camera for Klipper
Now that you're sold on the awesome benefits of adding a camera to your Klipper setup, it's time to choose the right one! Don't worry, it's not as mind-boggling as it might seem. We'll break it down into bite-sized pieces, starting with the most popular option:
USB Webcam
A USB webcam is a simple and convenient option for adding a camera to your Klipper setup. You just need to plug it into your Raspberry Pi and configure it with Fluidd or Mainsail. Some of the advantages of using a USB webcam are:
Easy Configuration: You don't need to install any drivers or modify any settings to use a USB webcam with Klipper. You can easily adjust the resolution, frame rate, and other parameters from the web interface of Fluidd or Mainsail.
Variety of Options: You can choose from a wide range of USB webcams that suit your budget and preferences. You can find webcams with different features, such as autofocus, night vision, wide-angle, zoom, and more.
Affordable Prices: You can find USB webcams for as low as $30, which makes them a cost-effective option for adding a camera to your Klipper setup. You can also use an old webcam that you have lying around and repurpose it for your printer.
Multi-Purpose Functionality: You can use a USB webcam for other purposes besides monitoring your prints, such as video conferencing, streaming, security, and more.
Some popular USB webcams that work well with Klipper:
Logitech C270
This is a basic and reliable webcam that offers 720p HD video quality and a built-in microphone. It has a clip-on design that allows you to attach it to your printer or your monitor. It costs around $24 and is compatible with most operating systems and software.
Logitech HD Pro C920
This is a high-end webcam that offers 1080p Full HD video quality and a dual stereo microphone. It has a flexible stand that allows you to adjust the angle and position of the camera. It also has features like autofocus, light correction, and face tracking. It costs around $70 and is compatible with most operating systems and software.
Microsoft Lifecam HD-3000
This is a mid-range webcam that offers 720p HD video quality and a noise-canceling microphone. It has a universal attachment base that allows you to mount it on your printer or your desk. It also has features like autofocus, true color, and digital zoom. It costs around $39 and is compatible with most operating systems and software.
Raspberry Pi Cameras
A Raspberry Pi camera is a camera module that is designed to work with Raspberry Pi boards. You need to connect it to the camera port of your Raspberry Pi and configure it with Fluidd or Mainsail. Some of the advantages of using a Raspberry Pi camera are:
Designed for Pi Boards
You don't need to worry about compatibility or performance issues when using a Raspberry Pi camera with Klipper as long as you are using a raspberry pi. You can also access the camera settings and functions from the Raspberry Pi terminal or the web interface of Fluidd or Mainsail.
Budget-Friendly
You can find Raspberry Pi cameras for as low as $25, which makes them a very affordable option for adding a camera to your Klipper setup.
Considerations for using a Raspberry Pi camera:
Considerations for Raspberry Pi Cameras: You need to make sure that you are using a Raspberry Pi and that your Raspberry Pi has enough power and processing capacity to handle the camera module. You also need to be careful with the ribbon cable that connects the camera to the board, as it can be easily damaged or disconnected. You also need to find a suitable case or mount for your camera, as it does not come with any attachment mechanism.
Excellent Community Support: You can find a lot of resources and tutorials online that can help you set up and use a Raspberry Pi camera with Klipper. You can also get help and advice from other users and developers on forums, blogs, and social media.
Popular Raspberry Pi cameras that work well with Klipper:
Raspberry Pi Camera V2
This is the basic camera module that offers 8 megapixels and 1080p video quality. It has a fixed-focus lens that can capture images and videos in various modes and formats. It costs around $24 and is compatible with all Raspberry Pi models.
Raspberry Pi HQ Camera
This is a high-quality camera module that offers 12.3 megapixels and 4K video quality. It has a removable lens that can be replaced with different types of lenses, such as wide-angle, telephoto, macro, and more. It costs around $50 and is compatible with all Raspberry Pi models. However, you need to buy the lenses separately, which can add to the cost and complexity of the setup.
How to Configure a Camera in Klipper Using Fluidd
This guide focuses on how to configure both USB webcams and Raspberry Pi cameras in Klipper using Fluidd. It’s assumed that you’ve already installed Klipper on your 3D printer; otherwise you can refer to our Klipper installation guide using Fluidd and Mainsail OS.
Note: Some newer 3D printers like the Kingroon KP3S Pro V2 and Kingroon KLP1 come with Klipper already pre-installed. With these printers, usb webcams are compatible, and adding one to your setup is easy as plugging the camera in and adding a camera in fluidd.
How to Configure a Camera in Klipper Using Mainsail or Fluidd
Configuring a camera in Klipper using Mainsail enhances the 3D printing experience by enabling you to monitor prints and capture time-lapses. Both USB webcams and Raspberry Pi cameras can be configured for this purpose. Here's how to set them up:
USB Webcam Installation for Mainsail
Simple Setup
Connect the Webcam: Start by plugging your USB webcam into the Raspberry Pi. Mainsail and fluidd are compatible with most USB webcams, offering a straightforward setup.
Access the Mainsail or fluidd Interface: Log into the web interface. This is typically done through a web browser on a device connected to the same network as the Raspberry Pi.
Camera Configuration in Mainsail and fluidd
- Navigate to Webcam Settings: In the interface, go to the settings and locate the webcams section.
- Adding a Webcam: You can add a new webcam here. Name your webcam for ease of identification later on. After naming, save your changes and exit the settings window.
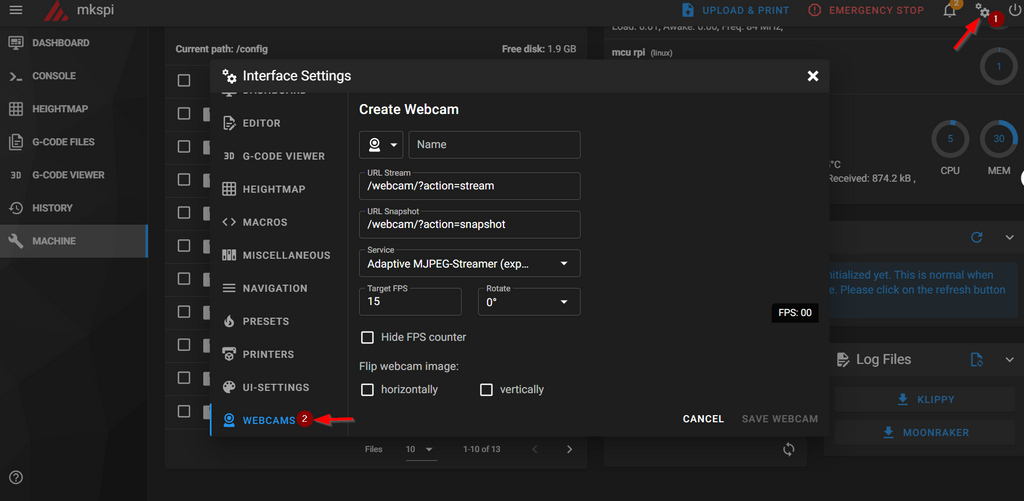
- Streaming Modes:Various streaming modes can be selected based on the camera type and your specific requirements.
- MJPEG-Streamer: This mode streams a series of JPEG images, providing a continuous video-like experience. It's suitable for general monitoring.
- Adaptive MJPEG-Streamer: An advanced version of MJPEG-Streamer, this mode adapts the image quality and frame rate based on network conditions.
- UV4L-MJPEG: Utilizes the User space Video4Linux framework for streaming MJPEG videos. It's more efficient and offers better performance on limited hardware.
- IP-Camera: For integrating network-based IP cameras, this mode allows easy integration of such devices into your setup.
- WebRTC (camera-streamer): This mode uses WebRTC with the camera-streamer for high-quality, real-time video streaming with low latency.
- WebRTC (MediaMTX): Another variation of WebRTC, suitable for more complex setups or specific hardware requirements.
- HLS Streamer: The HTTP Live Streaming (HLS) mode is used for setting up streaming services that can be accessed over the internet.
As shown above, there are a number of streaming options available. MJPEG-Streamer or Adaptive MJPEG-Streamer are the most common.
- Snapshot URL and Stream URL: If you only have one camera and you chose MJPEG-Streamer or Adaptive MJPEG-Streamer, then the url’s are as follows:
Stream URl: /webcam/?action=stream
Snapshot URl: /webcam/?action=snapshot
Additional Features
- Target FPS: You can set the target frames per second (FPS) to control the smoothness and clarity of the video stream.
- Rotate and Flip Webcam Image: These settings allow you to rotate or flip the webcam image, which is useful if the camera is mounted in unconventional positions.
Once the settings are configured, your webcam should now work in the Mainsail interface.
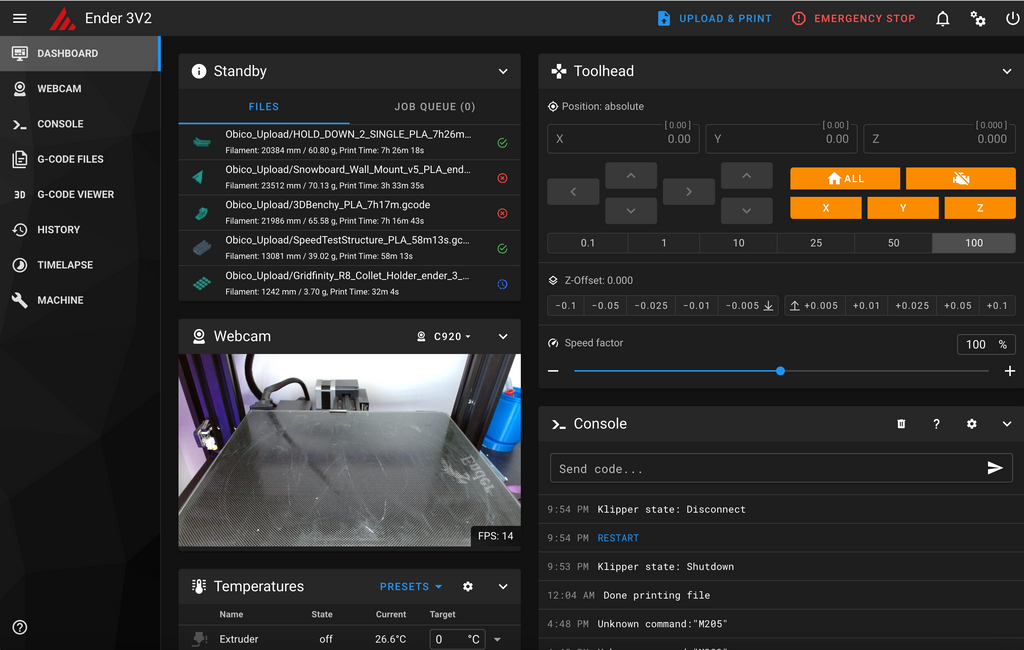
Each of these settings plays a crucial role in customizing your camera setup to fit your specific needs. Whether you’re using a simple webcam or a more advanced IP camera, these features in Fluidd and Mainsail provide a comprehensive toolkit for effective remote monitoring and management of your 3D printing projects.
Conclusion
In simple terms, adding a camera to your Klipper 3D printer setup is a great move. It lets you watch your prints from anywhere, catch any problems early, and even make cool time-lapse videos of your printing projects. Whether you choose a USB webcam or a Raspberry Pi camera, setting them up is easy with guides for Fluidd and Mainsail. This upgrade is not just about convenience; it's about making 3D printing more fun, efficient, and creative.
Leave a comment