Mainsail for Klipper - A Detailed Overview
Klipper firmware has changed the game in 3D printing. It doesn’t work inside the printer’s microcontroller like marlin firmware but uses a separate more powerful computer, like a Raspberry Pi or other SBC, for better performance. This means better prints, quicker speeds, and easier ways to tweak your printer. But, setting up Klipper can be tough since it uses text files and commands for configuration and edit the settings and may require high technical knowledge.
That’s where Mainsail and other web interfaces comes in. Mainsail is a user-friendly interface that makes it easier to use Klipper’s advanced features in easy and direct way through a web browser.
Here’s what makes Mainsail so handy:
Keep an Eye on Your Printer
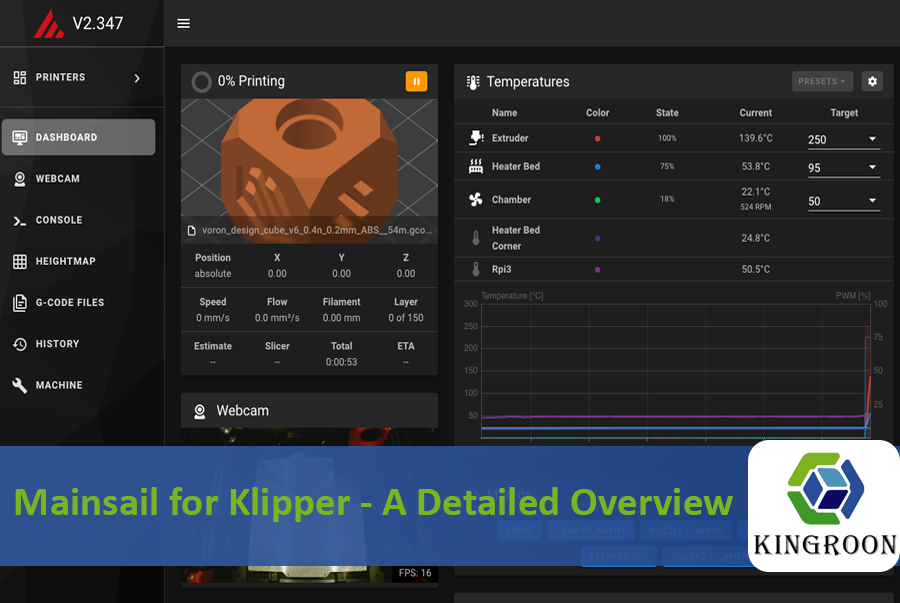
Watch your printer do its thing and check on important stuff like temperature, how much filament you’re using, where everything’s moving, and how far along your print is. It’s all shown in real-time with neat charts and info.
Easy Printer Commands
Forget about typing in tricky commands. Mainsail lets you control your printer from your web browser. You can start, stop, or cancel your prints with a click. Change the heat settings with a slide or type in numbers if you need to be super exact. You can even move your printer around right from the screen, which is great for getting things just right.
Sort Out Your Files
Keep all your printing files in order with Mainsail. Upload your Gcode files, put them in folders to stay organized, and look back at your print history to see how long things took, how much filament you used, and when you printed them.
Watch Your Prints Live
Connect a camera to Mainsail and you can watch your prints live. This way, you can keep an eye on things from anywhere and catch any problems early.
Make Printing Easier with Macros
Set up custom macros to make controlling your printer easier. They can do the boring stuff for you, like leveling the bed, changing filament, or setting up your extruder, so you don’t have to write long commands and forgot the G-code commands.
Tweak Your Printer Settings
With Mainsail, you can dive into Klipper and change your printer’s settings and configuration to make it work just how you like. Plus, you can keep Klipper and Mainsail updated with the latest cool features and fixes.
Add More with Plugins
Make Mainsail even better with plugins and added components. There’s a bunch you can add, like ones for making timelapses of your prints.
Now that you know what Mainsail is and its significance for your Klipper setup, let’s walk through the steps to get it installed.
Getting start with mainsail
There are four primary methods for installing Mainsail:
MainsailOS (Recommended): This pre-built operating system is specifically designed for Klipper and Mainsail, offering a streamlined installation process. MainsailOS is a prebuilt image for single board computers that already includes Mainsail, Moonraker and Klipper.
Manual Installation: For users who prefer a more hands-on approach, manual installation offers greater control over the setup process. However, this method requires a deeper understanding of the underlying components.
Docker-Based Installation: For users familiar with Docker, this method allows running Mainsail in an isolated container environment. While offering advantages in terms of isolation and portability, it requires a working knowledge of Docker concepts.
KIAUH - Klipper Installation
KIAUH stands for "Klipper Installation And Update Helper" and is a tool that helps you install or upgrade Klipper, Moonraker, Mainsail, and other extensions.
Detailed instructions for each installation method can be found in the official Mainsail documentation, ensuring a smooth setup process regardless of your chosen approach.
Navigating the Mainsail Interface: A Guided Tour
After successful installation, launch Mainsail in your web browser by entering the IP address of your mainsail interface on your browser. You'll be greeted by the intuitive Mainsail dashboard, your central hub for printer monitoring and control. Let's explore the key sections of this interface and understand mainsail features:
Dashboard Overview:
The Mainsail interface comprises a primary navigation menu, a navigation bar with an emergency stop button, notifications, and a few other options. Additionally, the main dashboard that have essential components for controlling and monitoring your 3D printer.
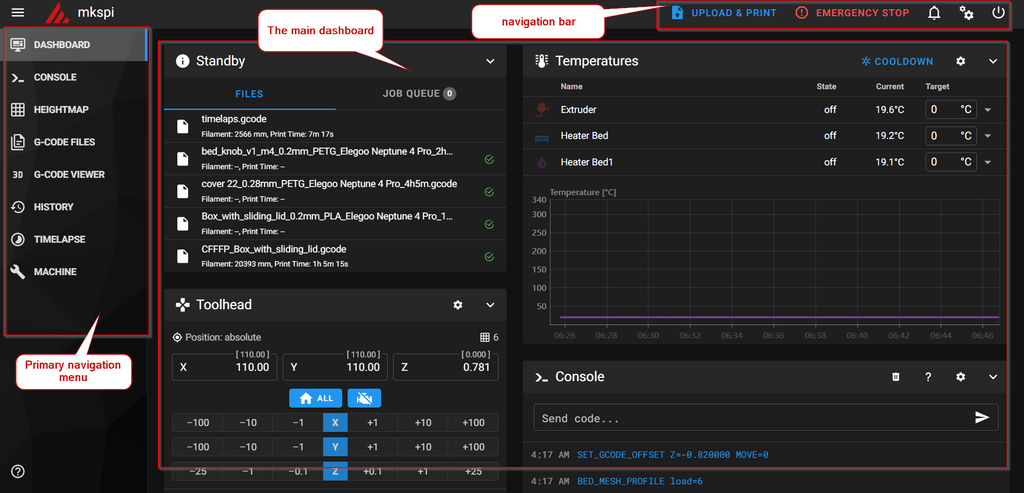
The mainsail navigating menu
This side vertical menu allows you to access many features in the mainsail interface.
1. Mainsail dashboard
This dashboard consists of many components. Let’s take apart the Mainsail components and understand what each part does.
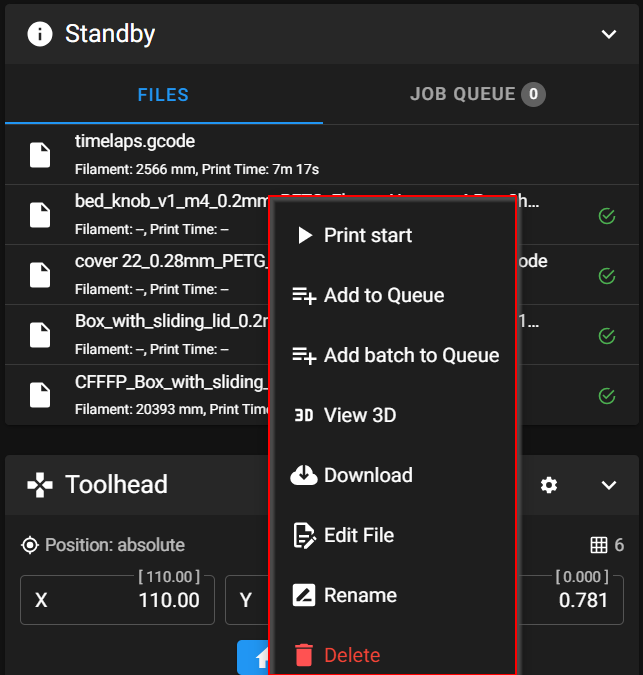
- Standby component
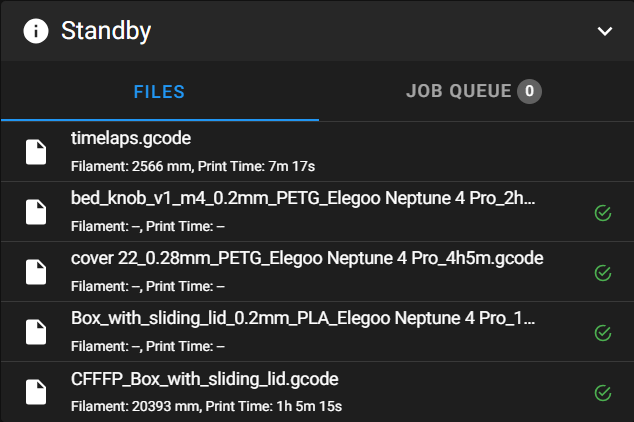
In this component, you can manage your G-code files and control the printing queue. Additionally, right-clicking provides more options, such as starting print a specific file.
2.Temperatures component
In this component, you can adjust the hotend and heat bed temperatures. Additionally, it displays graphs of temperature changes over time for better understanding.
3.Toolhead component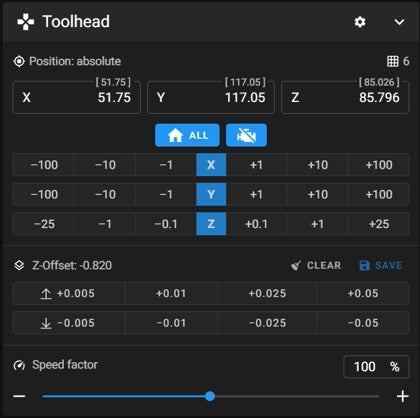
In this component, you can view the current absolute position of the printer head and use it to manually move the printer motors to specific positions in the X, Y, and Z directions. Additionally, you have the ability to disable the stepper motors, adjust the Z-Offset value, and control the printer speed in percentage.
4.The console component
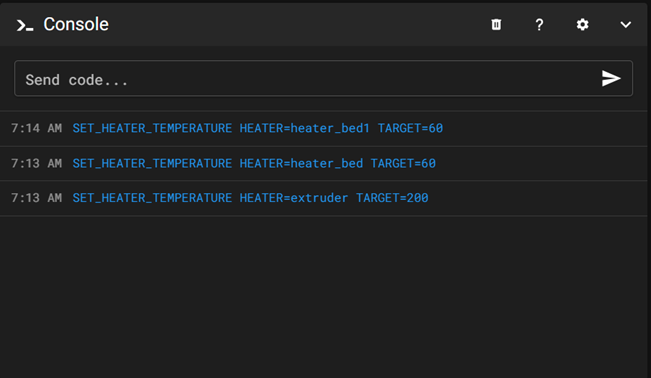
In this component, you can directly communicate with your 3D printer using commands and G-codes. Additionally, it provides feedback from your 3D printer.
5.The Extruder component
This component allows you to precisely control the extrusion process in your printer. It offers various options such as adjusting the Extrusion Factor, fine-tuning pressure advance values, setting smooth time, specifying filament length, and adjusting extrusion feed rate. Additionally, it enables you to extrude or retract a specific amount of material as needed.
6.The macros component
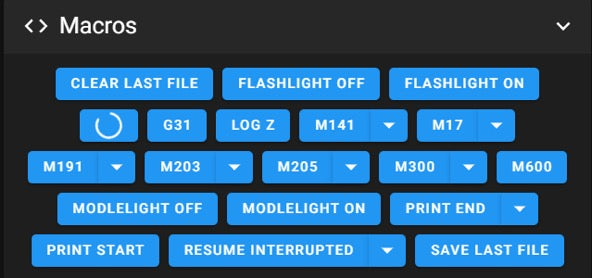
With Macros Component, you can create and manage shortcuts that perform specific tasks with a single click! Bundle together a series of commands, such as starting automatic bed leveling or canceling a print. Once you’ve set up a macro, you can use it anytime—no more typing out lengthy instructions! Macros are perfect for repetitive tasks, saving you time and effort. And since mainsale and Klipper are open source, you have the flexibility to create your own custom macros.
For example: you can click on the G29 macros command and your 3D printer will start the auto bed leveling. It is easy to access and perform and can save your time.
7.The machine component

In this component you have quick access to some important options related to your machine like adjusting the velocity, square corner velocity, acceleration and Max. Accel. to Decel.
8.The miscellaneous component
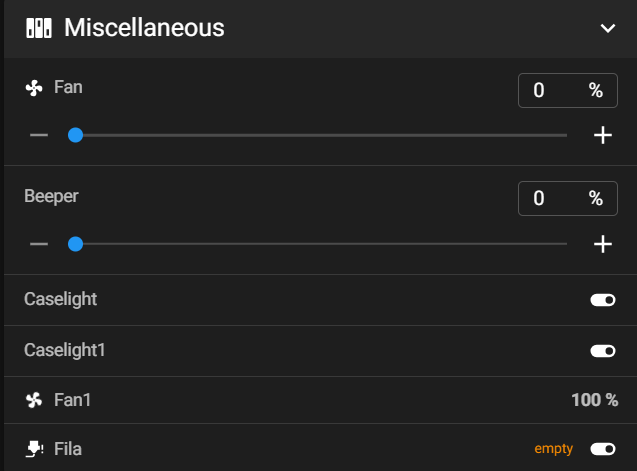
In this component, you have the ability to adjust the printer's layer fan speed as a percentage, and you can also activate the printer's beeper to produce sounds at different frequencies. Additionally, you can manage the caselight and access information regarding the filament sensor status.
Now that we've completed exploring the Mainsail dashboard components, let's move on to discover the other navigation menu options available in Mainsail interface!
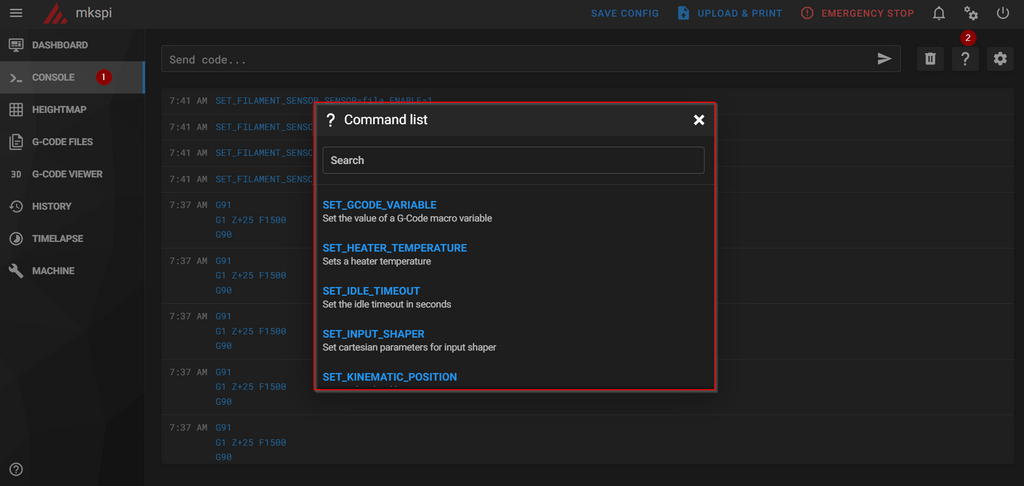
2. The console options
This option opens a new page containing the console, enabling you to communicate directly with your 3D printer using commands. Additionally, Mainsail provides access to a command list, offering quick access to commonly used commands for your convenience.
3. Heightmap
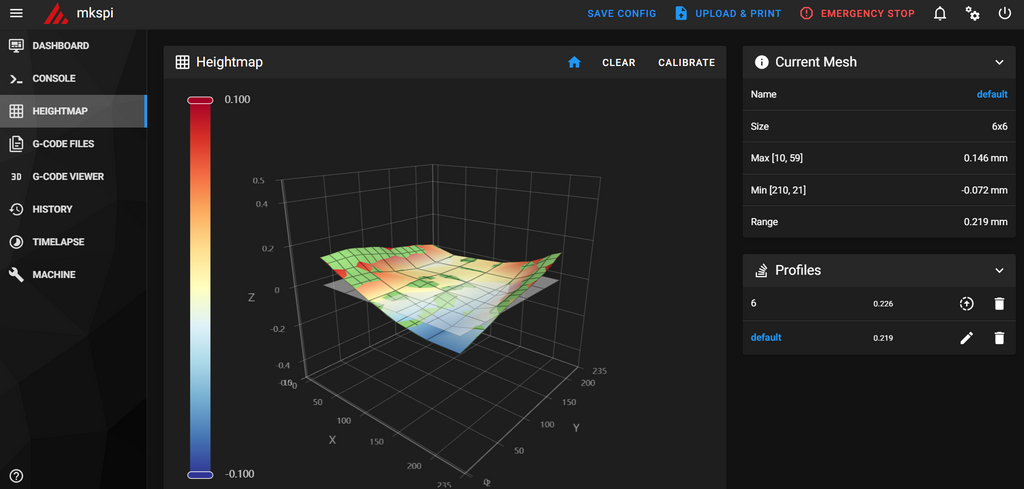
Selecting this option opens a new page providing crucial details about mesh bed leveling. Here, you can navigate through a 3D map representing your heatbed leveling, allowing you to visualize and understand the surface better. You also have the option to recalibrate your printing surface for improved results. Additionally, you can save multiple profiles, which proves useful if you use different printing metal sheets, enhancing flexibility and efficiency in your printing process.
4. G-code files
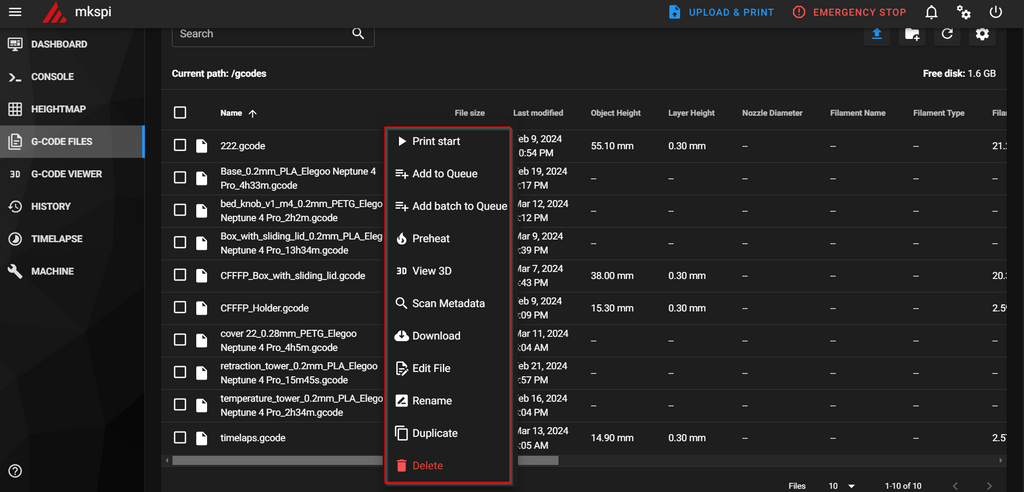
In this component you can manage your G-code files that you have previously uploaded, you can arrange your files in folders or upload new files. You can also right-click on specific file for more options like print start or 3D view and more!
5. G-code viewer
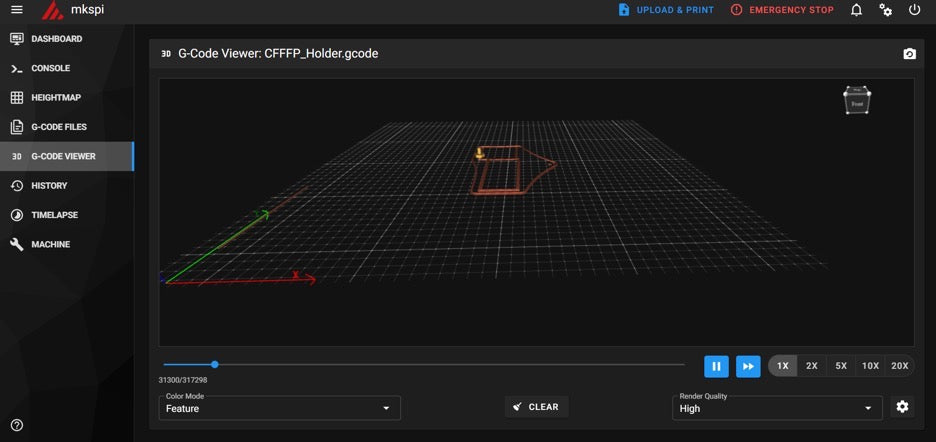
This option enables you to simulate your G-codes in 3D before starting the actual printing process. This feature is incredibly useful as it allows you to test your files and identify potential issues to prevent failures. The simulation offers various options such as controlling the speed, displaying the toolhead, and showing travel moves, among others, providing you with a comprehensive overview of the printing process.

6. History
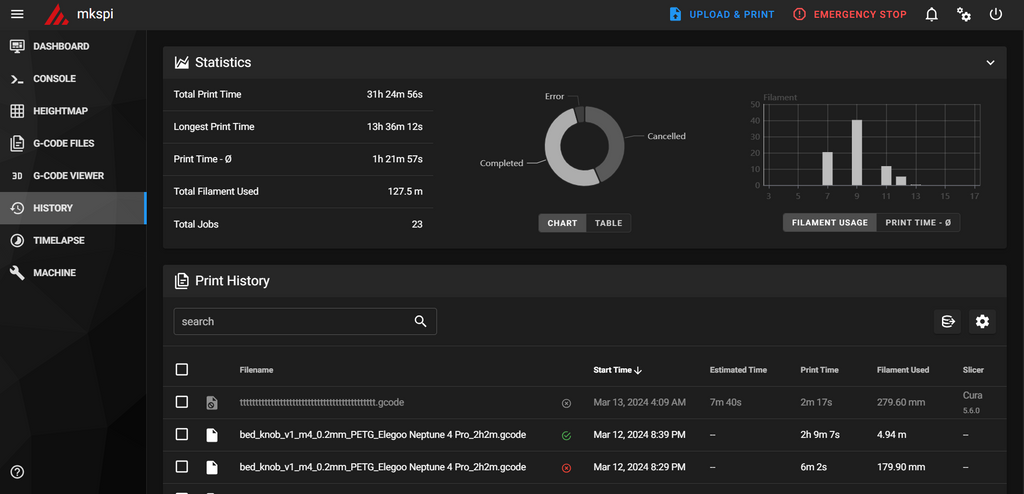
In this option you can check out your past print jobs and see some useful statistics. This includes details like whether the print job was successful, how long it took, and how much filament was used. You can even choose to reprint a previous job if you need to. It's a handy way to keep track of your printing progress and learn from your past projects.
7. Timelapse
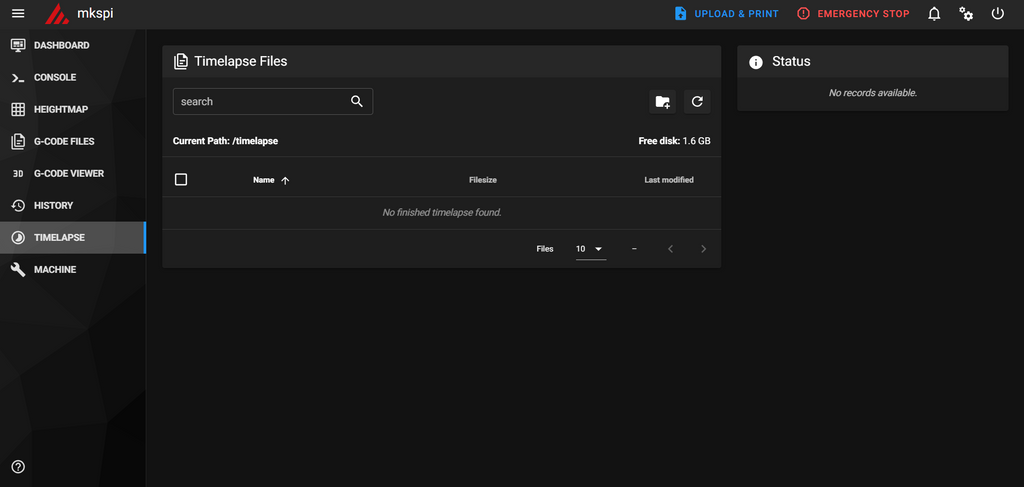
When you select this option, it takes you to a page where all your recorded timelapse videos are stored. You can use the search function to find a specific timelapse video quickly, or create folders to organize your timelapse videos neatly. Additionally, you can right-click on any specific file for more options, such as downloading the file to share it on your social media platforms, for example. It's a convenient way to manage and share your timelapse recordings hassle-free.
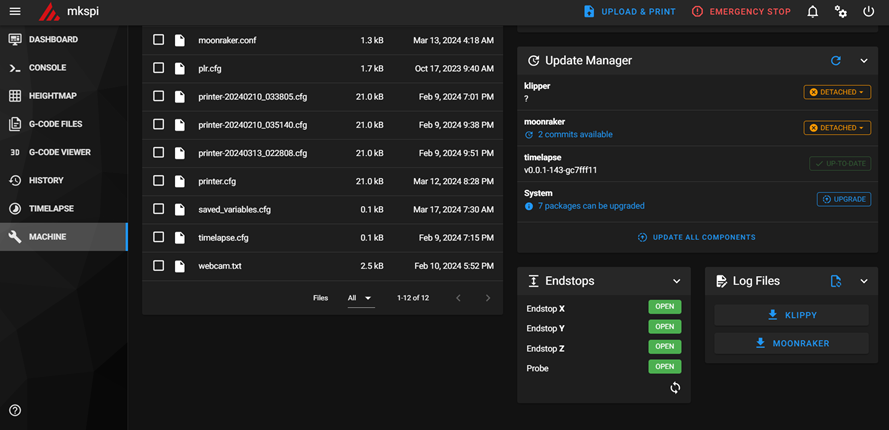
8. Machine
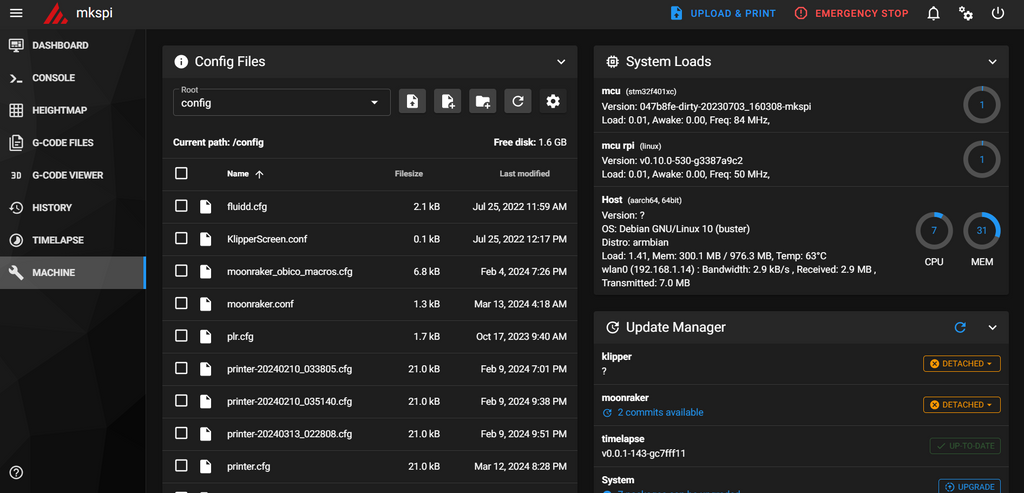
The "Machine" option has five parts that look like what you see on the main Mainsail dashboard. With this option, you can quickly check important info about your printer's hardware status using the System Loads part. The Update Manager helps you easily update Klipper, Moonraker, and other system packages. You can also tweak specific settings by opening and editing configuration files in the Configuration Files section. If you run into problems, the Log Files part provides helpful logs for figuring out what's wrong. Lastly, the End Stops section shows you if your printer's limit switches and z-probe are triggered and you can use it to test the functionality of these switches.
We've finished exploring the Mainsail side navigation menu, but there's more! There are additional options, details, and customization features available to optimize your Mainsail experience. To access Mainsail's interface settings, simply click on the two gears icon located on the upper left side of the page in the navigation bar. Here, you'll find a plethora of options that we may break down further in a separate article. For now, you can visit the Mainsail documentation site via this link to find detailed explanations for this section.
Mainsail vs. Fluidd: Choosing the Right Interface
Fluidd is another popular web interface option for Klipper users. While both interfaces share core functionalities, there are some key distinctions to consider when making your choice:
Interface and Usability
Mainsail boasts a clean, modern interface with a focus on simplicity and ease of use. Fluidd offers a more colorful and feature-rich interface, potentially overwhelming for beginners.
Feature Set
Both interfaces offer core functionalities like printer control, monitoring, and file management. Mainsail focuses on a streamlined core experience, while Fluidd provides a wider range of built-in features like slicer integration and user management.
Community and Support
Both Mainsail and Fluidd enjoy active communities. Mainsail's documentation is generally considered more comprehensive, while Fluidd's community might feel more welcoming to beginners due to its focus on visual appeal.
Ultimately, the best choice depends on your individual preferences and needs. If you prioritize a clean, user-friendly interface and extensive documentation, Mainsail might be the ideal choice. If you prefer a feature-rich interface with a more vibrant community, feel, Fluidd could be a better fit.
We've gone over all the features and explained the Fluidd interface in a separate article. You can read it by following this link.
Troubleshooting Common Issues
Even with a user-friendly interface like Mainsail, occasional hiccups might occur. Here are some common issues and their solutions:
Connectivity Problems:
Verify Network Connection: Ensure your computer running Klipper and the device you're using Mainsail on are connected to the same network. Double-check Wi-Fi connections or confirm proper ethernet cable connections.
Check Firewall Rules: Firewalls might sometimes restrict communication between Mainsail and Klipper. If you suspect firewall issues, temporarily disable your firewall to test connectivity. Remember to re-enable it afterward for security reasons.
Restart Klipper and Mainsail: Sometimes, a simple restart of both Klipper and Mainsail can resolve connectivity issues.
Firmware Configuration Errors:
Review Configuration Files: If you encounter errors related to printer behavior or unexpected results, there might be mistakes in your Klipper configuration files. Carefully review the relevant sections for typos or incorrect values. Utilize the official Klipper documentation and online communities for troubleshooting guidance.
Validate Configuration: Mainsail often offers a configuration validation feature. Use this tool to identify any syntax errors or inconsistencies within your configuration files before attempting to print.
Plugin and Extension Conflicts:
Disable Conflicting Plugins: If you suspect a specific plugin might be causing issues, try disabling it temporarily to see if the problem persists. Re-enable plugins one by one to pinpoint the culprit.
Check Plugin Compatibility: Ensure you're using plugins compatible with your current versions of Mainsail and Klipper. Outdated plugins can sometimes introduce conflicts. Refer to the plugin documentation for compatibility information.
FAQs: Addressing Your Mainsail Queries
Here are some frequently asked questions regarding Mainsail:
- How does Mainsail compare to other Klipper interfaces?
Mainsail is known for its clean, user-friendly interface and focus on core functionalities. Compared to some interfaces offering a wider range of built-in features, Mainsail prioritizes simplicity and ease of use. Additionally, Mainsail boasts well-regarded documentation and a strong community for support.
- Can Mainsail manage multiple printers?
Currently, Mainsail doesn't natively support managing multiple printers simultaneously. However, there are workarounds involving running multiple instances of Mainsail on the same computer or utilizing community-developed plugins that aim to enable multi-printer management.
- How to contribute to Mainsail development?
The Mainsail project thrives on community contributions. If you're interested in getting involved, you can explore various avenues:
- Report bugs and suggest improvementsthrough the official GitHub repository.
- Contribute code or documentationif you have the technical expertise.
- Join the community forumsto share your experiences, help others, and stay updated on the latest developments.
Conclusion: Mainsail - The Key to Unlocking Klipper's Potential
Mainsail acts as a bridge between the advanced capabilities of Klipper firmware and user-friendly accessibility. Its easy-to-use interface empowers users of all levels to take charge of their 3D printing experience. From real-time monitoring and control to advanced features like custom macros and plugin support, Mainsail simplifies workflows, boosts efficiency, and makes printing more enjoyable.
As both Klipper and Mainsail communities grow, we can anticipate exciting new features and functionalities. With its focus on user-friendliness and a thriving development ecosystem, Mainsail is set to remain a leading choice for Klipper-powered 3D printing.
Leave a comment